Expo Bare Workflowで複数環境に対応する


最近、ExpoのBare Workflowで複数環境に対応することがあったので備忘としてやったことを残しておきます。
ここでいう複数環境とは開発、ステージング、本番などのアレです。
今回は、開発用、ステージング用、本番用それぞれにデバッグとリリースのアプリをビルドできるようにしました。なので全てビルドすると全部で6つのアプリが作られることになります。
あとiOSについてのみです。Androidについてはいずれ。
やったことは以下の通りです。
- Bare Workflowで初期化
- Configurationを追加する
- Schemaを作成する
- 複数アプリをビルドできる環境作り
- iOS Development TargetとPodfileのバージョンを揃える
- Podfileを整える
最後の「Podfile」の調整がどこにも書かれてなくて苦労しました。
ちなみにExpo SDKのバージョンは41です。
Bare Workflowで初期化
$ expo init bare-workflow
? Choose a template: › - Use arrow-keys. Return to submit.
    ----- Managed workflow -----
    blank                 a minimal app as clean as an empty canvas
    blank (TypeScript)    same as blank but with TypeScript configuration
    tabs (TypeScript)     several example screens and tabs using react-navigation and TypeScript
    ----- Bare workflow -----
    minimal               bare and minimal, just the essentials to get you started
❯   minimal (TypeScript)  same as minimal but with TypeScript configuration
今回はminimal (TypeScript)を選択
Configurationを追加する
ios/bareworkflow.xcworkspaceを Xcodeで開いて、プロジェクト設定のConfigurationを以下のように増やす。
増やす際にDebug〜はDebugを、Release〜はReleaseを複製。
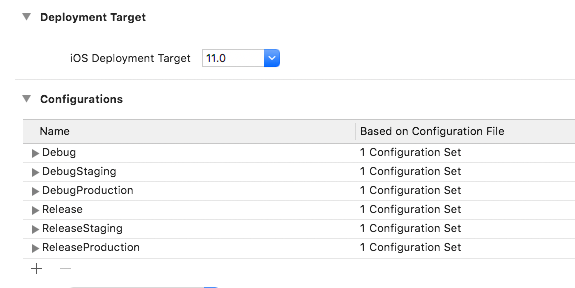
- 開発デバッグ用 → Debug
- 開発リリース用 → Release
- ステージングデバッグ用 → DebugStaging
- ステージングリリース用 → ReleaseStaging
- 本番デバッグ用 → DebugProduction
- 本番リリース用 → ReleaseProduction
Schemaを作成する
Schemaの複製
まずはじめに最初からある Schemaをベースにステージング、本番用のSchemaを複製する
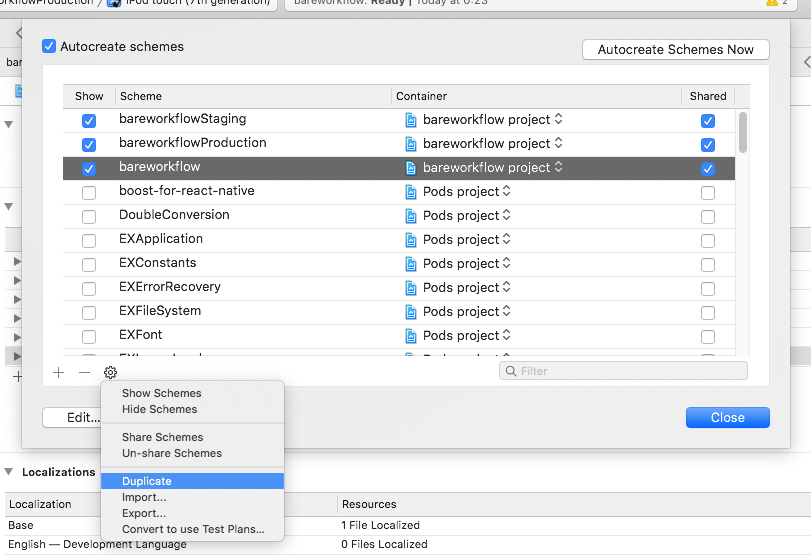
- ステージング用 → bareworkflowStaging
- 本番用 → bareworkflowProduction
Build Configurationを変更
Schemaが用意できたら、Build Configurationの項目を事前に作っておいた Configurationに変更していく。
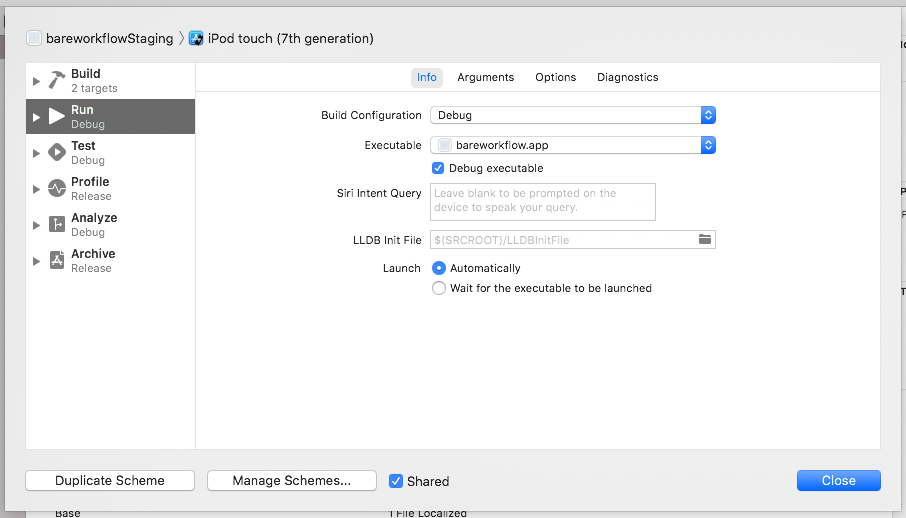
Run、Test、AnalyzeはDebug → DebugStaging またはDebugProductionに変更。
Profile、ArchiveはRelease → ReleaseStaging またはReleaseProductionに変更すれば OK。
複数アプリをビルドできる環境作り
「Targets」の方で色々設定をしていきます。
Bundle identifierを環境ごとに変える
※ベースになる Bundle identifierは適宜変更しておきます。
「Targets」の「Build Settings」に「+」ボタンがあるので選択。

「Add User-Defined Settings」で新しいユーザー定義を作成。
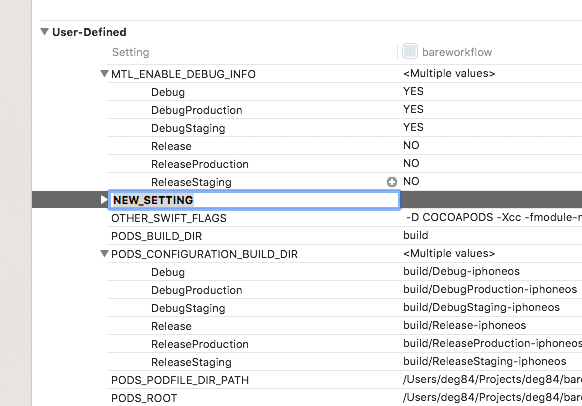
BUNDLE_IDENTIFIER_SUFFIXとして、Configurationにそれぞれを設定を入れていく。
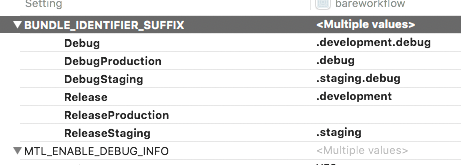
- Debug → .development.debug
- DebugProduction → .debug
- DebugStaging → .staging.debug
- Release → .development
- ReleaseProduction → 何も設定しない(Bundle identifierをそのまま使う)
- ReleaseStaging → .staging
最後に設定したBUNDLE_IDENTIFIER_SUFFIXを使う設定を行う。
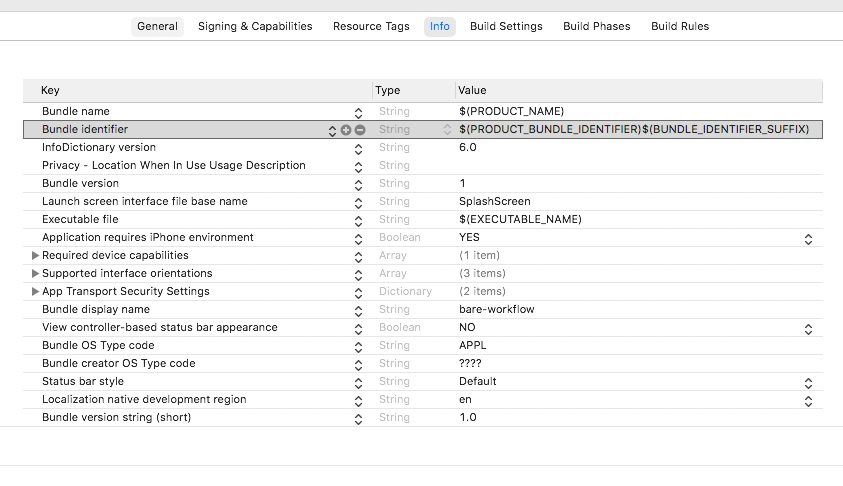
「Info」の「Custom iOS Target Properties」の「Bundle identifier」を$(PRODUCT_BUNDLE_IDENTIFIER)$(BUNDLE_IDENTIFIER_SUFFIX)に変更する。
Bundle display nameを環境ごとに変える
同じように「Build Settings」にDISPLAY_NAME_PREFIXを追加する。
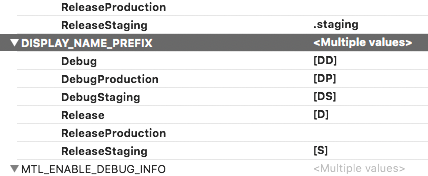
- Debug → [DD]
- DebugProduction → [DP]
- DebugStaging → [DS]
- Release → [D]
- ReleaseProduction → 何も設定しない
- ReleaseStaging → [S]
このあたりは好みで、できる限り短くしておくのが良いと思います。
インストールしたときにアイコンの下に出るテキストにあたるところなので長すぎるとアプリ名が出なくなっちゃいます。
こちらも「Info」で使うように設定します。
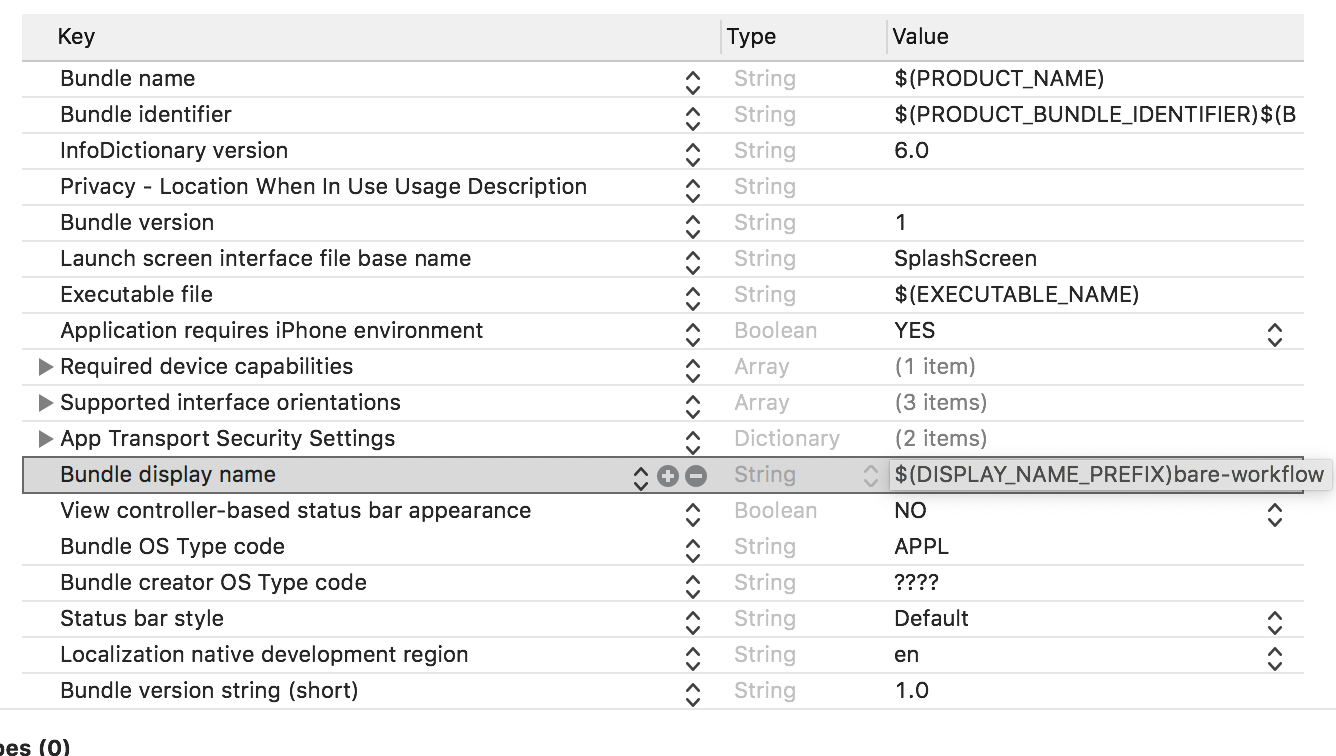
「Bundle display name」を$(DISPLAY_NAME_PREFIX)アプリ名に変更する。
ちなみに、この設定をすると「General」の「Display Name」が[DD]アプリ名になるので一瞬大丈夫か不安になりますが、大丈夫です。
※以降「General」の「Display Name」を変更しないこと
iOS Development TargetとPodfileのバージョンを揃える

執筆時点ではPodfileでiOS 11が設定されているのでそれに合わせてiOS Development Targetを「11」に変更
Podfileを整える
expo initで生成された Podfileに対して以下の変更を加える。
require_relative '../node_modules/react-native/scripts/react_native_pods'
require_relative '../node_modules/react-native-unimodules/cocoapods.rb'
require_relative '../node_modules/@react-native-community/cli-platform-ios/native_modules'

platform :ios, '11.0'

# highlight-start
# projectの設定を追加。
# Configurationに追加したものを設定。
project 'bareworkflow', # プロジェクト名
  'Debug' => :debug,
  'DebugStaging' => :debug,
  'DebugProduction' => :debug,
  'Release' => :release,
  'ReleaseStaging' => :release,
  'ReleaseProduction' => :release
# highlight-end

target 'bareworkflow' do
  use_unimodules!
  config = use_native_modules!

  use_react_native!(:path => config["reactNativePath"])

  if !ENV['CI']
# highlight-start
    # configurationsの指定を追加
    use_flipper!({ 'Flipper' => '0.80.0', configurations: ['Debug', 'DebugStaging', 'DebugProduction'] })
# highlight-end
    post_install do |installer|
      flipper_post_install(installer)
    end
  end
end
以上の設定で、Expo Bare Workflowでも複数環境に対応することができました。